Tuesday, November 28, 2023

Troubleshooting Guide: MyWiFiExt Not Working — How to Fix It

 In the fast-paced world of technology, a reliable and robust internet connection is crucial for our daily activities. However, issues can arise, and one common problem faced by many users is the MyWiFiExt not working. This can be frustrating, but fear not — in this blog post, we’ll guide you through the troubleshooting process to get your WiFi extender up and running smoothly.

MyWiFiExt Not Working

Check the Basics:

Before diving into complex solutions, it’s essential to ensure the basics are in place. Verify that your WiFi extender is powered on and properly connected to a power source. Also, confirm that the extender is within the range of your existing WiFi network.

Verify Internet Connection:

Make sure that your primary WiFi network is functioning correctly. Test the internet connection on your main router to ensure there are no disruptions. If the issue persists, it might not be related to the extender.

Update Firmware:

Outdated firmware can lead to compatibility issues and performance problems. Visit the manufacturer’s website to check for any available firmware updates for your WiFi extender model. If an update is available, follow the provided instructions to install it.
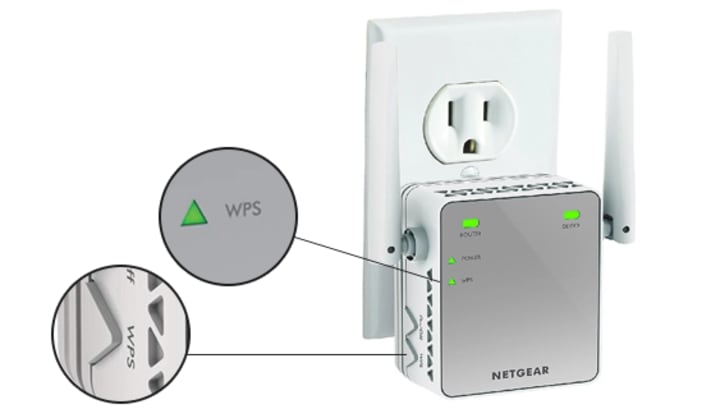
Reset the Extender:

If the MyWiFiExt setup is not working, performing a reset might help. Use a paperclip or a similar tool to press and hold the reset button on the WiFi extender for about 10 seconds. This will restore the extender to its factory settings. Afterward, reconfigure the extender as per the setup instructions.

Check Placement:

The location of your WiFi extender plays a crucial role in its performance. Ensure that it is placed in an area where it can receive a strong signal from the main router and effectively extend the coverage. Avoid placing it in areas with high interference, such as near large metal objects or other electronic devices.

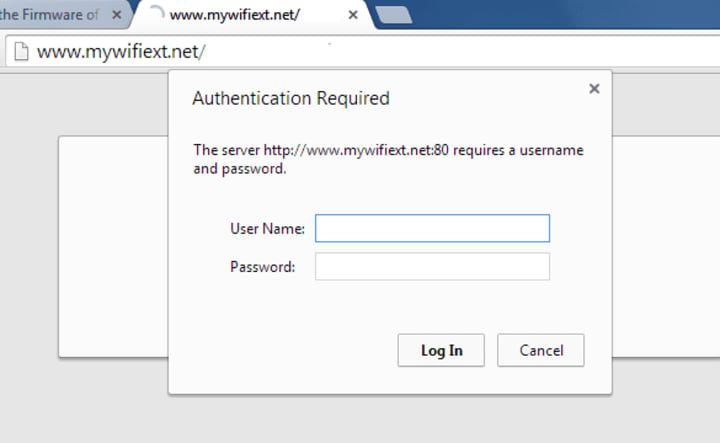
Password and Security Settings:

Ensure that you are entering the correct WiFi network password during the setup process. Also, confirm that the security settings on the extender match those of your main WiFi network. Misconfigurations in security settings can lead to connectivity issues.

Router and Extender Compatibility:

Check if your WiFi router and extender are compatible with each other. Different WiFi standards (such as 802.11n, 802.11ac) may not be compatible, causing connection problems. Ensure that both devices support the same WiFi standard for optimal performance.

Contact Support:

If all else fails, Don’t fret! Call our dedicated support number +1(855)201–8071 for swift assistance. Our experts are ready to guide you through any hurdles, ensuring your WiFi extender functions seamlessly. Trust us to get you back online in no time.

Conclusion:

A non-functional MyWiFiExt can be a headache, but with a systematic approach, you can resolve the issue and enjoy a seamless internet experience. By checking the basics, updating firmware, resetting the extender, optimizing placement, and ensuring compatibility, you increase the chances of successfully resolving the problem. If all else fails, reaching out to customer support will provide you with expert assistance tailored to your specific situation. Remember, a little troubleshooting can go a long way in getting your WiFi extender back on track.

Source Link: https://networktechblog.com/mywifiext-not-working/

Wednesday, October 11, 2023

A Guide to Connecting Netgear Extender to a New Router | Call Now +1(855)201-8071

 If you've recently upgraded your router or moved to a new location, you may need to reconnect your Netgear WiFi extender to the new router. This is a simple process that ensures your extender continues to provide you with excellent wireless coverage. In this guide, we'll walk you through the steps to connect Netgear WiFi extender to a new router.

Connecting Netgear Extender to a New Router


Methods 1. Connecting a Netgear WiFi extender to a new router using Web interface

Step 1: Prepare Your Equipment

Before you begin the setup process, gather the following items:


    1. Your Netgear WiFi extender.
    2. The new router's network name (SSID) and password.
    3. A device with a web browser (e.g., a computer, laptop, or smartphone).
    4. An Ethernet cable (optional but useful for initial setup).

Step 2: Reset the Extender (If Necessary)

If your Netgear WiFi extender was previously connected to a different network, it's a good idea to reset it to its default settings. This ensures that you're starting with a clean slate. To reset the extender, locate the reset button on the device (usually a small hole) and press it with a paperclip or a similar tool for about 10 seconds. The extender will reboot and return to its factory settings.


Step 3: Power On the Extender

Plug in your Netgear WiFi extender into a power outlet. Ensure that it is within range of your new router but not too close. A moderate distance is ideal to ensure it can effectively extend your network.


Step 4: Connect to the Extender

Using your computer or mobile device, open your list of available WiFi networks. You should see a new network with a name similar to "NETGEAR_EXT" or "EXXXXX" (where "XXXXX" is a unique identifier for your extender). Connect to this network.


Connecting Netgear Extender to a New Router
Add a caption (optional)


Step 5: Access the Extender's Web Interface

Once connected to the extender's network, open a web browser and enter "http://mywifiext.net" in the address bar. This URL will take you to the Netgear extender setup page.


Step 6: Set Up the Extender

You'll be prompted to log in to the extender's interface. If you haven't set a custom username and password, use the default credentials (usually "admin" for both username and password). Make sure to change these default login credentials for security purposes.


Follow the on-screen instructions to configure the extender. When prompted, enter the SSID and password of your new router. The extender will then connect to your new network.


Step 7: Reconnect to Your Home Network

Once the extender successfully connects to your new router, it may reboot. After it comes back online, disconnect from the extender's network and reconnect to your home network. Your Netgear WiFi extender is now connected to your new router and ready to provide extended WiFi coverage.


Step 8: Test Your Extended Network

To ensure that your Netgear WiFi extender is working correctly, move to an area that was previously a dead zone in your home. Connect a device to your home network and check if you have a strong and stable WiFi signal.

Methods 2. Connecting a Netgear WiFi extender to a new router using WPS (Wi-Fi Protected Setup)

Note: Before you begin, ensure that your Netgear WiFi extender and new router both support WPS. Most modern routers and extenders do, but it's essential to check your device's user manual or specifications to confirm this.

Press the WPS Button on the Router:


On your new router, locate and press the WPS button. This typically involves holding down the WPS button for a few seconds until the WPS LED starts blinking. The exact location of the button and the LED may vary depending on your router model.


Press the WPS Button on the Extender:


How to Connecting Netgear Extender to a New Router
Add a caption (optional)


Quickly go to your Netgear WiFi extender and press its WPS button. Again, the location of this button may vary depending on the extender model. After pressing the WPS button, the extender will start looking for the router's signal.


Wait for the Connection:


The WPS LED on your extender should start blinking, indicating that it's trying to establish a connection with the router. This process may take a minute or two.


Connection Confirmation:


Once the extender successfully connects to your new router, the WPS LED on both the router and the extender should become solid, indicating a successful connection.


Test Your Extended Network:


To verify that the extender is working correctly, move to an area that previously had poor or no WiFi signal. Connect a device to your extended network and confirm that you now have a strong and stable WiFi connection.

Congratulations, you've successfully connected Netgear WiFi extender to your new router! You should now enjoy improved WiFi coverage and better connectivity throughout your home or office.

Experience seamless connectivity - call us at +1(855)201-8071 now to connect your Netgear WiFi extender to your new router!

Source Link: https://www.wirelessextendersetup.org/connect-netgear-extender-to-new-router/

Wednesday, September 20, 2023

Ultimate Guide on Netgear Powerline 1200 Setup | Expert guidance

 Struggling with Netgear Powerline 1200 setup? Don’t worry; our expert team is just a call away, ready to guide you to a seamless and powerful home network. In this blog, we’ll walk you through three simple methods for setting up your Netgear Powerline 1200 to ensure a stable and speedy home network. Dial +1855–201–8071 for expert guidance.

Netgear Powerline 1200 setup


Method 1: Basic Plug-and-Play Setup

The Netgear Powerline 1200 is known for its user-friendly setup, making it accessible to even those who aren’t tech-savvy.

  1. Unbox and Inspect: Open the package and ensure you have the following items: two Powerline adapters, two Ethernet cables, and the Quick Start Guide.
  2. Plug and Connect: a. Plug one Powerline adapter into an electrical outlet near your router and connect it to your router using an Ethernet cable. b. Plug the second Powerline adapter into an outlet in the area where you want to extend your network, and connect it to the device (e.g., computer, gaming console) using the second Ethernet cable.
  3. Pair the Adapters: Most Powerline adapters come pre-paired, but if not, follow the instructions in the Quick Start Guide to pair them. This typically involves pressing a button on each adapter.
  4. Test Your Connection: Once the adapters are paired, check your devices for a stable and high-speed internet connection.

Method 2: Using the Netgear Powerline Utility (Advanced Setup)

If you want more control over your Powerline network, you can use the Netgear Powerline Utility for advanced settings.

  1. Install the Utility: Download and install the Netgear Powerline Utility on your computer from the Netgear website.
  2. Plug in the Adapters: a. Plug one adapter into an outlet near your router and connect it to your router via Ethernet cable. b. Plug the second adapter into an outlet where you need the extended network and connect it to your device using another Ethernet cable.
  3. Run the Utility: Open the Netgear Powerline Utility on your computer. It will detect your Powerline adapters automatically.
  4. Configure Settings: Within the utility, you can:
  • Change the network name (SSID) and password for your Powerline network.
  • Monitor the network performance.
  • Update firmware if necessary.
  1. Test Your Connection: After configuring your settings, test your devices for a reliable connection.

Method 3: Security and Encryption

To secure your Powerline network and protect your data, follow these steps:

  1. Change Default Passwords: Change the default login credentials for your Powerline adapters to something unique. This prevents unauthorized access.
  2. Enable Encryption: Most Powerline adapters support encryption. Within the Netgear Powerline Utility or through the adapter’s web interface, enable encryption using the recommended settings (usually AES encryption).
  3. Check LED Lights: Make sure the LED lights on your Powerline adapters indicate a secure connection.

Conclusion

The Netgear Powerline 1200 is a versatile solution for improving your home network. Whether you prefer a basic setup, advanced control, or enhanced security, these three methods allow you to tailor your Powerline experience to your specific needs. With the Powerline 1200, you can enjoy reliable and high-speed internet connectivity throughout your home without the hassle of running new wires or dealing with Wi-Fi dead zones. Say goodbye to network frustrations and hello to seamless connectivity!

Source Link: https://www.wirelessextendersetup.org/netgear-powerline-1200-setup/

Quick Guide 2023 on Netgear Powerline 1200 Setup

 Experience a new level of home network expansion with the Netgear Powerline 1200 setup. Say farewell to WiFi dead zones and unreliable connections. With the Powerline 1200, you can effortlessly extend your network's reach using your home's electrical wiring. Our simple setup process allows you to connect your Powerline adapters through three easy methods: standard Ethernet connectivity for wired reliability, WiFi Powerline for seamless wireless coverage extension, and the Powerline Utility software for advanced configuration and management.


Method 1:Netgear Powerline 1200 setup using Standard Process

Plug and Play:

Start by plugging one of the Powerline adapters into an electrical outlet near your router and connecting it to your router using an Ethernet cable. This adapter will act as the "sender."

Placement:

Plug the second Powerline adapter into an outlet near the area where you need improved connectivity. This adapter will act as the "receiver."

Pair the Adapters:

Most Netgear Powerline adapters come pre-paired, but if not, follow the instructions to pair them. This typically involves pressing the "Pair" or "Sync" buttons on both adapters until the LED lights indicate a successful connection.

Connect Your Devices:

Use Ethernet cables to connect your devices (computers, gaming consoles, smart TVs, etc.) to the Powerline adapter in the receiving area. These devices will now have a strong and reliable wired connection.

Method 2: Netgear Powerline 1200 setup using WiFi

Utilizing the Passthrough Adapter:

Choose a Powerline adapter with a built-in WiFi access point (such as the Netgear PowerLINE WiFi 1000). Plug this adapter into an outlet near your router.

Connect to the WiFi Network:

Use your computer or mobile device to connect to the WiFi network broadcasted by the Powerline adapter. You'll find the network name (SSID) and password in the adapter's manual or on a sticker on the adapter itself.

Extend WiFi Coverage:

Plug additional Powerline adapters into outlets throughout your home to extend your WiFi network's coverage. These adapters will connect to the main adapter via the electrical wiring and boost your WiFi signal.

Method 3: Secure and Manage via the Powerline Utility Software

Download and Install Software:

Visit the Netgear website and download the Powerline Utility software compatible with your adapter model. Install it on your computer.

Connect the Adapter:

Plug the Powerline adapter into an outlet near your router and connect it to the router via Ethernet cable.

Launch the Software:

Open the Powerline Utility software on your computer. It will detect the Powerline adapter connected to your router.

Configure and Monitor:

Use the software to configure settings, monitor network performance, and ensure a secure connection. You can change the network name, password, and view the status of connected devices.

By following these three methods, you can set up your Netgear Powerline 1200 adapter to optimize your home network effortlessly. Whether you prefer a wired connection, extended WiFi coverage, or wish to manage your network settings, the Powerline 1200 offers a versatile solution to meet your connectivity needs.

For expert guidance and assistance with your Netgear Powerline 1200 setup, don't hesitate to call our dedicated support team today. We're here to ensure your home network expansion is seamless and hassle-free.


https://www.wirelessextendersetup.org/netgear-powerline-1200-setup/

Troubleshooting Guide: MyWiFiExt Not Working — How to Fix It

  In the fast-paced world of technology, a reliable and robust internet connection is crucial for our daily activities. However, issues can ...